I've had luck with grinding a notch in stripped screws, with a cut off wheel on a die grinder or a hacksaw if there's room. The notch then holds a straight slot screw driver.
You are using an out of date browser. It may not display this or other websites correctly.
You should upgrade or use an alternative browser.
You should upgrade or use an alternative browser.
My new Project
- Thread starter bucks77ford
- Start date
bucks77ford
We will Rise Again
I've had luck with grinding a notch in stripped screws, with a cut off wheel on a die grinder or a hacksaw if there's room. The notch then holds a straight slot screw driver.
I ended up having to drill them out and then using this technique I was able to loosen two of them. The other two, I actually just welded a small nut to the ground off bolt and it held up enough to get them out.
bucks77ford
We will Rise Again
So I tore down the dash a bit to clean the ducting out and see if there was any mice nests or anything and to inspect the wiring. The harness looks good, but it's amazing what you find with wiring. I found this just hanging there; looks like a capacitor of some sort but it wasn't hooked up

And this was a relay made to take the place of the blower motor relay.

But, all in all I didn't find any nests, but did find a bunch of leaves in the ducting and vacuumed up a bunch of mouse terds and dirt. I didn't find any chewed wires or anything so now just replace a couple odds and ends and put it back together.


I need to get a new cluster back as this one is starting to crumble, just not sure if I can get a back that will accomodate the low fuel econ light.


And this was a relay made to take the place of the blower motor relay.
But, all in all I didn't find any nests, but did find a bunch of leaves in the ducting and vacuumed up a bunch of mouse terds and dirt. I didn't find any chewed wires or anything so now just replace a couple odds and ends and put it back together.
I need to get a new cluster back as this one is starting to crumble, just not sure if I can get a back that will accomodate the low fuel econ light.
- Moderator
- #64
That looks like a noise suppression choke Buck....like a one sided transformer used for getting rid of ignition noise....generally has a cap along with it.
Doing a great job on this, i love these trucks, i have tons of parts for 76-79 ford trucks.
bucks77ford
We will Rise Again
That looks like a noise suppression choke Buck....like a one sided transformer used for getting rid of ignition noise....generally has a cap along with it.
It did have an aftermarket radio, so I wonder if that's what it was used for. Either way, it won't be going back in.
Doing a great job on this, i love these trucks, i have tons of parts for 76-79 ford trucks.
Thanks man. It's coming along. The cold weather isn't making it easy to do bodywork, but there are other things I can work on.
- 3
- 0
80f150....what kind of parts do you have for a 76F100???
bucks77ford
We will Rise Again
I've been cleaning up some PO hack job on some wiring and figured it would easy to add some auxillary circuits. My original fuse block is only 5 circuits so it makes it difficult to add anything and I don't want fused wires coming out of the original block all over the place like the PO did. So, I went to Napa and bought a couple 6 circuit fuse blocks and added one for 12V Hot and one for 12V Keyed ignition. I don't plan on adding anything heavy and if I ever did, I'd upgrade to a high output alternator and then run a separate fuse block under the hook with a megafuse and some 4 gauge wire. Just having a an aftermarket radio, electric brake controller, gauges, another 12V power source for the kids stuff, electric choke, etc. can be alot for these old trucks. I will get a schematic of how i did it.
Last edited:
Looking good mate.
bucks77ford
We will Rise Again
bucks77ford
We will Rise Again
I dove into the front clip by taking most of it apart to clean things up, throw some paint on the inner fenders, core support and power coat anything small that I can. The hood hinges came off like a PITA. The square nuts on the inside of the inner fenders were just turning, so I will need to use just regular bolts when going back together. BTW, anyone know what the original thickness of the the body mount rubber bushings are? Mine don't look too bad and since I'm not taking the cab off, I'd hate to ruin the original hardware by replacing something I really don't need too.
Again, the detail I'm taking on this truck isn't no where near my 77, but figured I'd do what I can without taking too much apart and putting me more and more in the hole. My goal is to get this one ready to go this spring/summer to pull a camper and use as a daily worker so time is limited, but I'm doing what I can. Figuring, if I can brush on some rust preventative paint where I can will be better than nothing and just rust.


Here are some parts that I powder coated. Battery tray needed just a quick corner repair (not the greatest weld, but will do for a batt tray, metal was pretty thin in that corner).


I had some chrome powder coat so I thought I'd just throw it on


Again, the detail I'm taking on this truck isn't no where near my 77, but figured I'd do what I can without taking too much apart and putting me more and more in the hole. My goal is to get this one ready to go this spring/summer to pull a camper and use as a daily worker so time is limited, but I'm doing what I can. Figuring, if I can brush on some rust preventative paint where I can will be better than nothing and just rust.
Here are some parts that I powder coated. Battery tray needed just a quick corner repair (not the greatest weld, but will do for a batt tray, metal was pretty thin in that corner).
I had some chrome powder coat so I thought I'd just throw it on
primetime
sawmill slave
Source for the chrome powder coat?
bucks77ford
We will Rise Again
Source for the chrome powder coat?
Eastwood. There are two different kinds. One that looks really nice but requires a clear coat over it or it will tarnish. I have that one, but doesn't turn out as good as it should because my cheap powder coat gun doesn't have the voltage to put on a good 2nd clear coat. So, the one I have been trying out is a single stage chrome powder coat. It's not as "shiny" as what a good chrome with clear coat, but it'll do for what I'm using it for.
fatherdoug
Tonto Papadapolous
I like the duller gray finish of the single stage.
bucks77ford
We will Rise Again
I like the duller gray finish of the single stage.
Ya, it's not bad. I don't mind the finish at all. While it's not "true chrome", it does put a nice coating and sets things off a bit. I have black, a metallic blue, yellow and chrome so I'm just trying to use it up on whatever I can without making things look like crap.
bucks77ford
We will Rise Again
The continuing cold weather and snow up here has sort of delayed my project a bit in some sense. I haven't concentrated too much on the body work, but managed to start taking more things apart than I expected, but I'm glad I am. I was just going to leave the cab lights in place because I didn't want to mess with the headliner, but I decided against it and took out the headliner which was full of mouse crap and there were mouse nests all up there. Next was the doors because I wanted to take the seat and old carpet out (which again was unplanned at this stage). Again, under the carpet toward the rear of the cab was a big ol mouse nest, crap and all kinds of chewed up paper and what not. Maybe by cleaning the headliner, vacuuming up all the crap and getting new carpet or rubber mat the "old truck mouse smell" will start to come out. I did end up just using putting some paint on the lower cab and front of the bed so I could stick the bed back on for more room in my small garage.


The floor looks good. There is only one spot on the driver rocker where there is some rust, but seems solid. I'm not sure what to do with the floor. Since it's in such good shape, I'm not sure I want to mess with it. Otherwise, I thought about putting down some bedliner (I've heard good things about monstaliner) and then carpet on top of it, or just the bedliner and use it as my floor since it will get dirty, or just throw carpet or a new rubber mat on it, or clean it and put down some dynamat and then carpet. What would you guys do? I'm just thinking about trying to prevent the floor rusting out in the future.
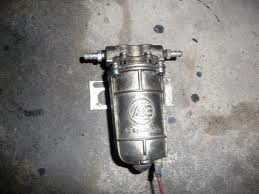
I also took a pic of the fuel line setup for the dual tanks. I think I am just going to eliminate the dual tank setup for now, but I wasn't sure about what was going on. I was just wondering what this was? I cleaned it off a bit and it has "AC spark plugs" on it. A blue wire that I was wondering about that wasn't hooked up is attached to it. There is also the selector switch with the brown wire attached. I'm still new to much of this and have never looked closely at a dual tank setup so just trying to put things together.


The floor looks good. There is only one spot on the driver rocker where there is some rust, but seems solid. I'm not sure what to do with the floor. Since it's in such good shape, I'm not sure I want to mess with it. Otherwise, I thought about putting down some bedliner (I've heard good things about monstaliner) and then carpet on top of it, or just the bedliner and use it as my floor since it will get dirty, or just throw carpet or a new rubber mat on it, or clean it and put down some dynamat and then carpet. What would you guys do? I'm just thinking about trying to prevent the floor rusting out in the future.
I also took a pic of the fuel line setup for the dual tanks. I think I am just going to eliminate the dual tank setup for now, but I wasn't sure about what was going on. I was just wondering what this was? I cleaned it off a bit and it has "AC spark plugs" on it. A blue wire that I was wondering about that wasn't hooked up is attached to it. There is also the selector switch with the brown wire attached. I'm still new to much of this and have never looked closely at a dual tank setup so just trying to put things together.
fatherdoug
Tonto Papadapolous
Do the fuel lines from both tanks go to that "thingy"? If they do, it must be the switching valve, but it's not like one I've seen before. The switching valve is usually directly in front of the aft axle fuel tank. If it's only on the common line from the tanks to the carburetor, could it be an old electric fuel pump?
If I remember right, the wire color is brown from the switching valve on the dash to the fuse block, and then blue from the fuse block to the switching valve(on my '78).
If I remember right, the wire color is brown from the switching valve on the dash to the fuse block, and then blue from the fuse block to the switching valve(on my '78).
bucks77ford
We will Rise Again
Both tank lines come into the switch (brown wire) and then one line from the switch is hooked to the "thingy" and then to the main line to the motor. I'm assuming that it's an old electric fuel pump, but not sure why it's there.
fatherdoug
Tonto Papadapolous
I found a picture of that on a British car forum? It is an electric fuel pump. I also don't know why it would be used, unless it was a stopgap fix for inadequate feed to the carburetor, for whatever reason.
bucks77ford
We will Rise Again
View attachment 2584
Here is a pic of the original build sheet I found under the seat. You should be able to zoom in and read it better. I'm gonna get a Marti Report to compare.
Other things I've found tearing it apart was the original owner registration and an original bucktag along with it that looks brand new.
Here is a pic of the original build sheet I found under the seat. You should be able to zoom in and read it better. I'm gonna get a Marti Report to compare.
Other things I've found tearing it apart was the original owner registration and an original bucktag along with it that looks brand new.
Last edited:
Ford Truck Articles
-
 Where Are Ford Trucks Made?Have you ever wondered where Ford trucks are made? If you drive a Ford...
- FTF News
- Updated:
-
-
2000 Ford Ranger - A Look Back2000 Ford Ranger: Reliability and Performance Review The 2000 Ford...
- FTF News
- Updated:
-
2024 Ford Ranger Raptor vs Ford F-150 Raptor RFord hopes to wow off-road enthusiasts this year. Not only are they...
- FTF News
- Updated:
-
Ford Ranger Raptor Coming to U.S. in 2023(photo credit: KBB) If you love fast trucks, then you should be...
- FTF News
- Updated:
-
Raptor Bed Liner CoatingsRaptor Bed Liner Review: Unmatched Protection for Your Truck Bed Most...
- FTF News
- Updated: