Join Our Ford Truck Forum Today

Document your Ford truck project here and inspire others! Login/Register to view the site with fewer ads.

broke something in the window, possibly regulator

yesterday, my window was icy. i tried for a split second to roll it down. usually i do that, and if there is resistance, i give up. instantly, something broke. whatever it was fell to the bottom of the door.

i can hear and feel the motor moving something inside the door up and down, but the window doesn't move. is that the regulator?

1) can i leave it go until the spring and not worry about the window falling down halfway to st. louis on my way there for christmas?

2) does that sound like the regular, and if so - anyone know of a good how-to write-up?
 

blackhat620

You Had to be There
1,687
150
Arizona
Yep sounds like something in the regulator assembly broke, exactly what, you will not know until you remove the door panel and look. Window should stay up, try to push it down with your hands just to make sure it will not fall down. If it moves down a little just push it back up. If it is loose you can push it up and tape it in place for your trip.

Most window regulator assemblies are riveted in place and use very large (1/4") rivets which require a large rivet gun. See if you can rent or borrow one of these as they are a specialty tool for most people.
www.autobodytoolmart.com/pc-11689-765-astro-14-heavy-duty-hand-riveter-1426.aspx
 

john112deere

caffeine junkie
Staff member
10,807
405
central Vermont
I haven't dealt with the window regulators in anything newer than a Model A...but is there a reason he can't drill the rivets out and use bolts to put it back together? (Space limitations, I'm guessing, but...)
 

Black150

California Chapter member
169
1
So Cal
Instead of taping the window up so everyone can see, i'd push the glass all the way up and pull the rubber from the track up to the bottom of the glass. Then just put some vice grips on the track, up tight to the rubber. A zip tie would work just as well.

While you're in there you might want to check the condition of the torque pins in the motor. They tend to break apart over time.
 

blackhat620

You Had to be There
1,687
150
Arizona
I haven't dealt with the window regulators in anything newer than a Model A...but is there a reason he can't drill the rivets out and use bolts to put it back together? (Space limitations, I'm guessing, but...)


You nailed it space limitations.
 
I have replaced many of those big aluminum rivits that ford uses to hold the regulators on with bolts. You just need the right bolts and a set of small hands. I usually have some kid hold them for me to get them started. My hands are too big to get where I need to inside the doors with the small holes to reach through.

I have done so on every one that I have repaired so far. Both trucks and cars.

A cold chisel and a hammer cuts the head off quickly to get them out of your way.

The hardest part is getting the door panel off without damaging anything.
 

Skandocious

Post Whores Make Me Sick
19,076
655
California
any tips on that part so that i can at least get it there and look at it?
Tip: Don't try to save the little christmas tree clips. Resistance is futile :rofl:

They're meant to be replaced so don't worry about damaging them-- just go buy a big pack at Auto Zone (they sell them, don't go to the dealer).


As for your problem-- you may have sheared the teeth off of one of the gears on the regulator; pretty common issue in these trucks. You can buy new gears and just replace the gears instead of the whole regulator. Looks like this:


getimage.php


I got that picture from Rockauto.com. You can order them there or probably get them at the local auto parts store too YelloThumbUp

But you may have a different problem altogether :p
 

blackhat620

You Had to be There
1,687
150
Arizona
any tips on that part so that i can at least get it there and look at it?

Easiest with trim panel removal tools. Take it slow and easy working from around from one corner. Also make sure you have removed all screws from the arm rest, handles etc. Then as you get the panel loose reach in and carefully unhook all electrical connections. Connectors usually have a tab you need to release before removeal.

www.autobodytoolmart.com/c-758-clip-removers.aspx
 
...But you may have a different problem altogether :p
thanks!

i'm going to try to buy as much as i can locally so if the weather is nice saturday or sunday (supposed to be in the 50s) i can get it done and not worry about it all winter.
 

Lost

PA Chapter leader
3,288
33
central PA
Hey whats with old sig pic.

Any problems U let me know.
 

lil_dq

Let 'er eat boys!
6,933
265
Union, MO
I replaced the gears in my FIL's truck and used a carrige style bolt it worked fine if you have any ?'s PM me and I will send you my cell #. I remember what we had to do and it would be nice to have another hand.
 

95F350XL

Master Junk Tech
We use bolts at work. Dont always have enough of the big rivits. Its easy enough to get out. Especially the older gear style.
 
What they said, but I don't have the tool. I use a putty knife and a screw driver. Just get new clips. When I was repairing so many of them...I just got a box (100-I think) of the ford ones from a local auto body supply shop. You won't need that many for one panel though.
 

Skandocious

Post Whores Make Me Sick
19,076
655
California
Each door panel, in your truck Tom, takes 6 christmas tree clips. And no thats not the technical name-- that's just what I've always called them :D
 

blackhat620

You Had to be There
1,687
150
Arizona
Just an FYI, the clips come in different sizes so take one with you to the parts house to get the correct size.
 

Old_Paint

Old guy with old cars
225
29
Alabama
Instead of taping the window up so everyone can see, i'd push the glass all the way up and pull the rubber from the track up to the bottom of the glass. Then just put some vice grips on the track, up tight to the rubber. A zip tie would work just as well.

While you're in there you might want to check the condition of the torque pins in the motor. They tend to break apart over time.

The torque pins as mentioned above are the typical culprits. Don't know why, but something makes them get hard and brittle, and the gear reduction in that tiny little motor will crush them to oblivion. I keep a set in the glove box, because the older the truck/car, the more common window troubles. Things just don't line back up perfectly, the felt wears off the channel leaving glass against rubber, etc, etc, etc.

FYI, you CAN replace the rivets with bolts, as said above. I cut the heads off the rivets with a dremel because I didn't want the beating and banging on my door, which may affect the wing mirror motors if they're power mirrors. Mine aren't, but still, I don't like banging on things that weren't designed for banging on. The large head and body of the rivets are aluminum, however, the center pin is hardened steel. It WILL dull a chisel if you hit that. Grind the heads down, then use a drift punch to knock them out without having to pound the crap out of the door.

I've used bolts on both the '92 F-150 and the '86 T-Bird, both doors. They just have to be put in with the head of the bolt on the regulator side. The parts pictured are NOT the regulator. The regulator is the large arm with the 1/4 turn gear on it and coarse teeth, which are driven by the pinion gear on the motor. If you heard something fall inside, I'm curious about what you find. The torque pins in the motor assembly will shear long before any metal breaks. I put the bolts in the regulator frame in the places I can't reach with my fingers before I put the frame back in the door.

Now, if it's just the motor or drive gear, that can be removed without removing the rivets or the regulator. There will be some small dimples in the door at the locations where the motor screws are that fasten it to the regulator. Taking the motor off without removing the regulator is a LOT faster, and much easier. Drill out the small dimples and enlarge the holes to 1/2 inch so you can get a 5/16 nut driver or socket through the hole, Take out the three screws, and bingo, you have the motor loose.

A gear and pawl set will cost you around $30. Pawls alone are about $6. Motor assembly, about $120. These motors have a built in thermal overload to prevent damage from stalling at the bottom or top, or if the window jams somewhere in between. The last thing you need is a fire in your door, so the overload shuts the motor off if it stalls a couple seconds to prevent melting the insulation off the wiring.

There are two part numbers listed for a right and left door window motor. If you can't get the correct side, no biggie. De-pin the connector on the motor's pigtail, and swap sides with the wires. It'll work perfectly. It's a permanent magnet DC motor, and will run the opposite direction if polarity is reversed. (after all, it does have to run both directions to get the window up and down, right?) Otherwise, the footprint is EXACTLY the same.

If you have to get an entire motor assembly (not likely if you can hear it running), DO NOT buy the cheapy brand. They're not sealed as well, and will fill up with water very quickly. Water + Electric Motor = BAD. If you get the motor from a dealership, it will be a Motorcraft part. If you get it from a parts house, it'll be cheaper. Yes, cheaper. But, you'll find yourself back in that door within 6 months. I speak from experience. With the number of razor sharp edges in that door, expect to bleed. Wear long sleeves, and if you can get them, thin kevlar gloves. You ARE going to cut yourself in there. Guaranteed.

These little motors sometime just build a thick film on the commutators, or get some corrosion from moisture in the bearings. Not to worry. They CAN be disassembled, cleaned, lubricated. Use a good lithium high temperature grease in the bearings. Use scotchbrite to clean the commutator, and drag the slots in the commutator with a razor knife to clean out all the copper contamination between the bars. New brushes are not to be had that I know of, so if the brushes are shot, you're looking at a new motor. Be careful to not tear the gaskets on the end-bells of the motor when disassembling. If you do, glue them back together, and seal the endbells with RTV when you reassemble the motor. Reassembly can be a little tricky. After cleaning the bearings, you'll find the very strong magnets will snatch the commutator out of the comm end bell, subsequently pulling the commutator out from between the brushes. PITA!. Use a paper clip or light tie wire to hold the brushes back until the bell can be slipped onto the end of the motor shaft AFTER inserting the armature into the stator.

This is not a FUN job. You're going to find you need another wrist or elbow in your arm's physiology if you try to pull out the whole regulator. If your arms are large, get your skinniest friend to help. But, it's worth the effort if the rivets are loose and the mechanism is moving when you operate the window. I used grade 8 6 mm bolts (10mm head) that are about 12mm long (1/4-20 x 1/2 will do). ZERO problems with clearance.
 
ok, so initially i could hear something inside the door moving. i've got it all apart now and there's no motor noise when i press the up/down button.

1) where should i start looking for why there's no motor noise from the button? the passenger button works just fine.

2) what am i looking at below?
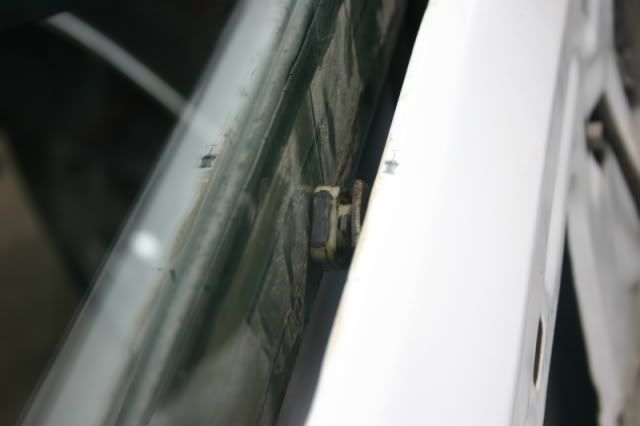
is this white tab supposed to go below the window? right now it's sitting ON the window, about an inch up from the bottom?
IMG_4383.jpg


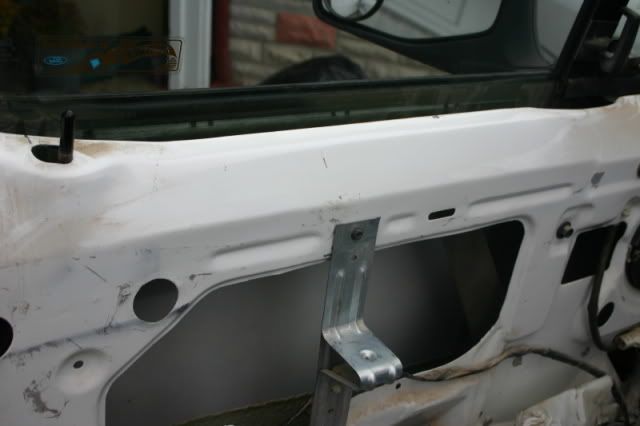
is the big metal arm that's attached to the white tab what controls the window going up and down? (sorta visible in the shadow of the door. top-right of the big hole)
IMG_4382.jpg


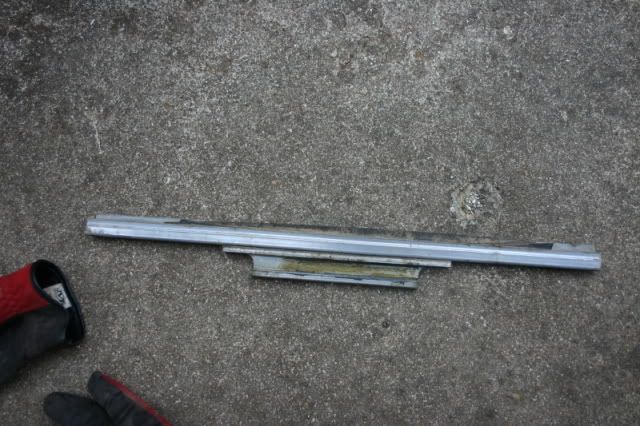
this is what fell to the bottom of the door? where does it go and what does it attach to? bottom of the window?
IMG_4384.jpg
 
ok, went back out for another look

the white tab in the first picture goes in the lower, greasy channel of the last picture. the bottom of the window sits in the channel on the top half of the metal thing. all that right?

the problem now is that the motor won't move. it needs to come down a couple inches to get the channel and everything to line up right.
 

Ford Truck Articles

Recent Forum Posts

Top