Austin
FTF's #1 Knob Polisher
I'm going to show ya'll some pictures. You might say 'wow!', or 'it looks better than new!'. But what if I were to tell you that there still is more to be done...
The average driver/mild enthusiast is looking for shine. The more the better. Just about anybody with some cheap equipment and consumer-grade chemicals can take care of that.


4. Shiny paint is easily accomplished with waxes, glazes, quick detailers, and mild polishes. These products are great for flawless paint or new cars. Heck, they can make Matt's GM look fantastic. ( ) But the one thing these products (generally) have in common is that they have no 'cut'. Cut is simply the detailing way of saying abrasives levels.
Think sandpaper: 1500 grit is going to do some good cutting, step up to 2500 and the sanding marks will be less aggressive. You can move finer into 3000, even 5000. The marks from those grits will be very fine... almost impossible to see.
3. To a detailer, the products above (not the sand paper) would be considered a final step. Working from that step back we move into aggressive polishes. These polishes offer more cut that the other products while still shining the paint. They remove light scratches, swirl marks, and some oxidation. All of these defects can be seen on any car/truck. They can be caused by lack of wax, improper washing, environmental fallout, etc. It's best to start on this level when correcting paint (saves time and money if you get the results you want!).
2. Now, say the aggressive polish didn't do much to your paint. Try a compound, often referred by me as liquid sandpaper. Compounds offer quite a bit of cut and come in various abrasive levels. Finer compounds are good to start with. As you work into products with more cut you're removing scratches that are deeper; acid rain marks, etc. But keep in mind that you are also dulling the paint!
1. Perhaps you have a heavy, single scratch on your rig. The compound seemed to level it some but you can still see it. Your fingernail probably catches on it. Looks like it's time for sanding. I always start with a 2500 grit paper, then work my way down if needed. The goal is to level the area around the scratch and the scratch itself. Assuming you started with the 2500, work to a finer grit paper before compound, then polish.
This is the break down with most of my details. Think of it as a flow chart of sorts. You can always start at the top, but does it give you the results you want? Say you try 4&3 with meager results and move onto step 2. You must work your way back up, following step 3 then 4. You are refining on every step.
Before you ever start any work do a test spot! Find the absolute worst area on you rig and test from there. If the paint can be corrected using only 2 of these steps, get to crackin'! 3 or 4 steps? Grab a 12 pack and get to crackin'!
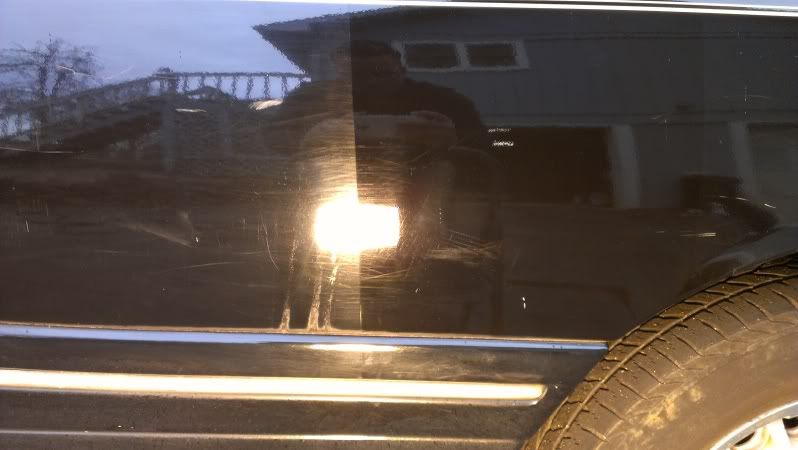
This pic shows that the right side certainly has more depth and shine, but you can still see scratches with the light. If you can see 'em in the light, the sun will show you even more!

The average driver/mild enthusiast is looking for shine. The more the better. Just about anybody with some cheap equipment and consumer-grade chemicals can take care of that.


4. Shiny paint is easily accomplished with waxes, glazes, quick detailers, and mild polishes. These products are great for flawless paint or new cars. Heck, they can make Matt's GM look fantastic. (
 ) But the one thing these products (generally) have in common is that they have no 'cut'. Cut is simply the detailing way of saying abrasives levels.
 Think sandpaper: 1500 grit is going to do some good cutting, step up to 2500 and the sanding marks will be less aggressive. You can move finer into 3000, even 5000. The marks from those grits will be very fine... almost impossible to see.
3. To a detailer, the products above (not the sand paper) would be considered a final step. Working from that step back we move into aggressive polishes. These polishes offer more cut that the other products while still shining the paint. They remove light scratches, swirl marks, and some oxidation. All of these defects can be seen on any car/truck. They can be caused by lack of wax, improper washing, environmental fallout, etc. It's best to start on this level when correcting paint (saves time and money if you get the results you want!).
2. Now, say the aggressive polish didn't do much to your paint. Try a compound, often referred by me as liquid sandpaper. Compounds offer quite a bit of cut and come in various abrasive levels. Finer compounds are good to start with. As you work into products with more cut you're removing scratches that are deeper; acid rain marks, etc. But keep in mind that you are also dulling the paint!
1. Perhaps you have a heavy, single scratch on your rig. The compound seemed to level it some but you can still see it. Your fingernail probably catches on it. Looks like it's time for sanding. I always start with a 2500 grit paper, then work my way down if needed. The goal is to level the area around the scratch and the scratch itself. Assuming you started with the 2500, work to a finer grit paper before compound, then polish.
This is the break down with most of my details. Think of it as a flow chart of sorts. You can always start at the top, but does it give you the results you want? Say you try 4&3 with meager results and move onto step 2. You must work your way back up, following step 3 then 4. You are refining on every step.
Before you ever start any work do a test spot! Find the absolute worst area on you rig and test from there. If the paint can be corrected using only 2 of these steps, get to crackin'! 3 or 4 steps? Grab a 12 pack and get to crackin'!
This pic shows that the right side certainly has more depth and shine, but you can still see scratches with the light. If you can see 'em in the light, the sun will show you even more!


 On edit, I'll throw in the Lincoln for some buffin, too.