Join Our Ford Truck Forum Today

Document your Ford truck project here and inspire others! Login/Register to view the site with fewer ads.

Brake Line repair


Flaringtool.jpg

tubingcutter.jpg


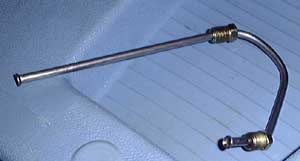
First, you have to start the process by getting your fingers all nasty and dirty. Once you do that, you can take a tubing cutter and cut the brake line to the desired length. Given the chance, I fully support the idea of putting a slight bend in the tube (in the middle if possible) that will allow you to flex the tube to make it shorter or longer since I've already figured out that one can measure it 10 times and it still won't quite come out right.
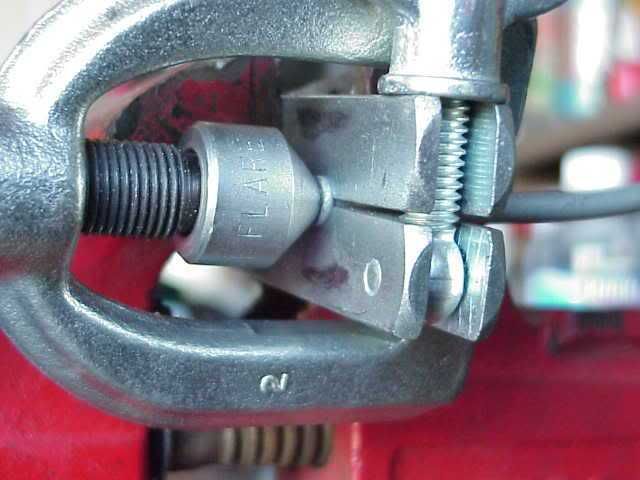
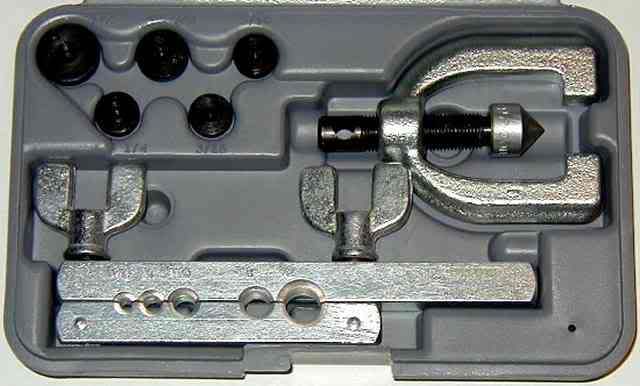
there are two ways to go about this. I've used a cut-off wheel on my Dremel tool to cut the brake line tube and then a small fine tooth file to de-burr the edges. I used the same model Flaring tool you are considering. I got a great flare on the first try and all others in my practice mode with this method. I would not consider myself a master at this by any stretch but, using this method worked for me.
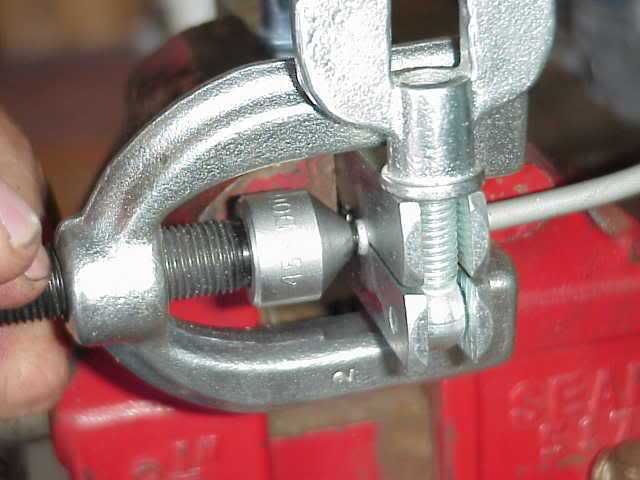
I use a tubing cutter, but, I also have a 1/4" multi-flute countersink that I de-burr the ID with. Probably removes most of the work hardening. I know if I don't use it my flares suck. Another thing is to make sure you have the clamp as tight as you can get it without breaking the wing nuts. (you can bend them a little, just not too much)

If you don't get it tight, the first part of the flare will push the tube down and then there won't be enough to double over.

Flare2.jpg

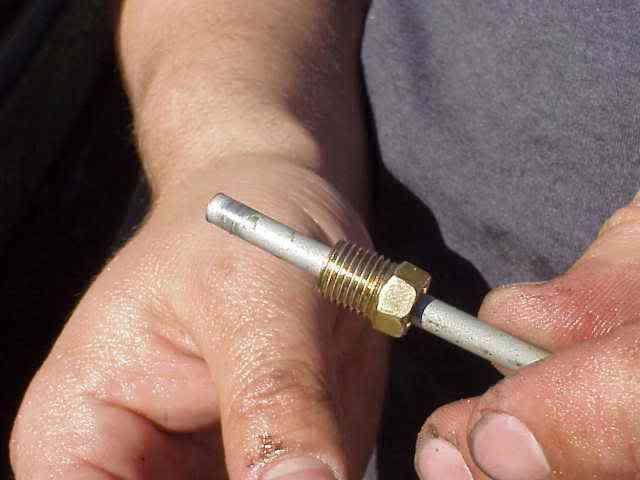
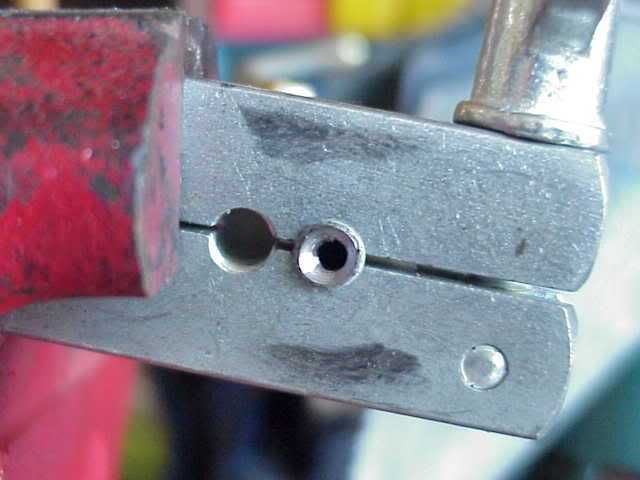
After the tubing is cut, immediately place the fitting over the tubing. Do it now....don't wait till later, don't stop to go get a drink, don't go to the bathroom, do not pass GO, do not collect $200....DO IT NOW! Been there, done that, lost the t-shirt! Yes, it is so easy to immediately start flaring and then realize the fitting is sitting on the work bench and you have a PERFECT flare on the end of the tubing that is now going to get cut off! (Remember....then it will probably be too short too!)
flare3.jpg

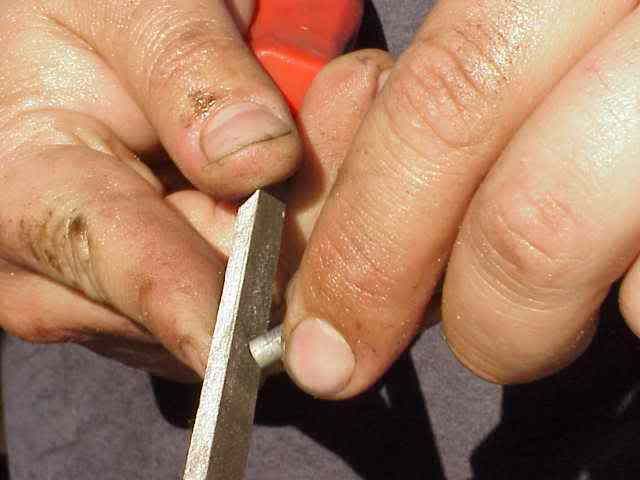
If the end of the tubing is not quite square or clean, you can dress it up a bit with a fine file.
flare4.jpg

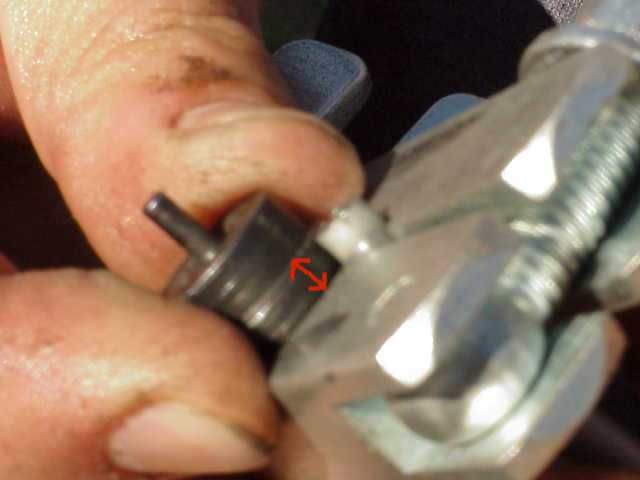
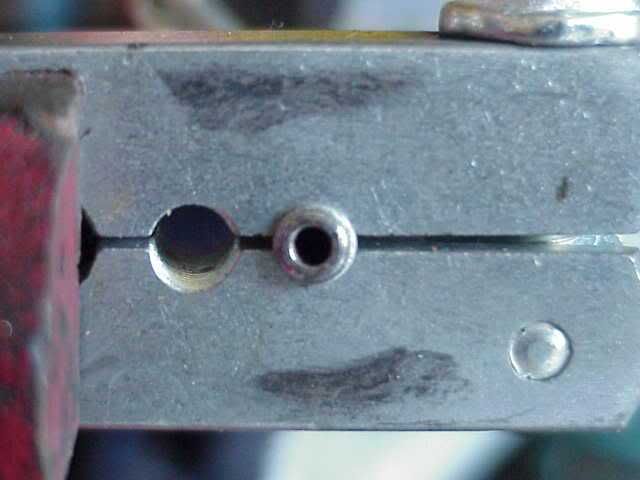
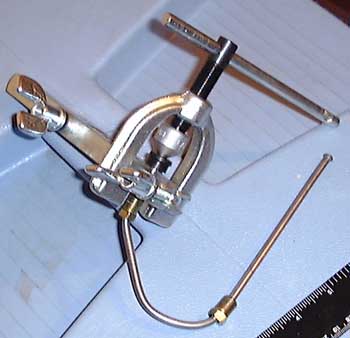
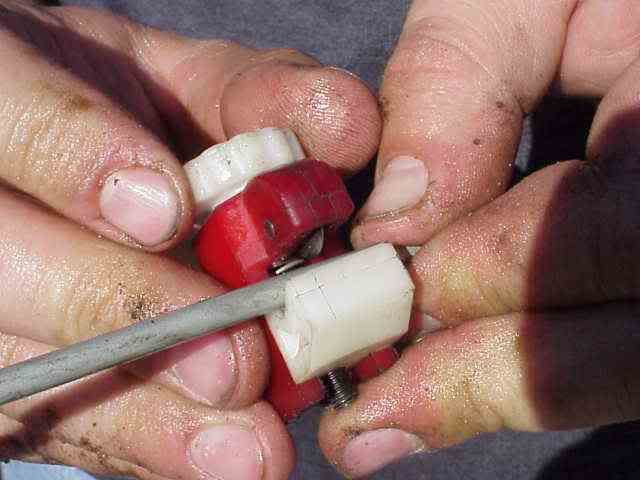
It is important to clamp the tubing at the correct length so the flare will come out correctly. In this photo, the small disc anvil is also used to gauge the tubing for the correct length. I've drawn a double ended arrow on the raised section of the anvil. Place the anvil flush against the clamp, adjacent to the protruding section of tubing, and adjust the tubing in the clamp until they are even with each other (as can be seen in the above picture). Tighten the wing nuts on the clamp as tight as you can so the tubing does not move while the flare is being formed.
Read on to page two.​
 
flare5.jpg

Slip the flaring tool over the clamp and place the anvil disc over the end of the tubing. Hold everything in place while you tighten the bolt in the flaring tool. At this point, you will tighten the bolt until the anvil disc is pressed completely flush to the clamp. You won't be able to see any portion of the tubing at that point.

flare6.jpg

Remove the flaring tool and the anvil disc. The flared end of the tubing should be well formed and even all the way around. The picture above is not a perfect example of what it should look like. This one was slightly off center because the end of the tubing was not cut squarely. As you can see, it caused the initial flare to be slightly formed off to the left side. Anyway, the above picture should give you a pretty good idea of what you are looking for. Nicely shaped, even all the way around, and properly centered on the end of the tubing
Flare7.jpg
Put the flaring tool back onto the clamp and once again tighten it. You are now applying the 2nd flare to the tubing. Tighten the bolt until it does not go any further.
flare8.jpg

Here is a close-up of the 2nd flare being applied. The bolt has been tightened as far as it can go.​

flare9.jpg
Here is the final product. This is the same one that was slightly off center after the first flaring step was completed. This has a slight ridge on it and won't provide a good seal. Because the end of the tubing was not squarely cut, it resulted in this imperfect flare.
Well, you've seen an example of not what to do....so obviously, you should have no problem identifying a good flare. It really is not that hard to do.
You can expect to spend around $35 and up for a good double flare tool. For occasional use, you might find it difficult to shell out $75 or more for a quality tool. But I would not recommend getting one from Harbor Freight either.
Good luck on your projects and remember to practice on a section of tubing before you do it for keeps. You can get a tubing at your local auto parts store. A 2' long section is plenty cheap and you will get a lot of practice from it.
 
For a DOUBLE FLARE:

REMEMBER TO PUT THE FLARE NUT ON THE PIPE BEFORE YOU FLARE IT OR YOU WILL HAVE TO CUT OFF YOUR NICE NEW FLARE AND START OVER! Put the flare tool's pipe clamp on using its 3/16 inch hole, expose the required amount of pipe, clamp it down, attach the 3/16 inch adapter, screw it down on the pipe while watching the pipe to make sure it doesn't slide out of the clamp, back out the clamp and remove the adapter, then finish the double-flare by screwing down the flare tool into the pipe. It's easier than it sounds, just follow the directions that come with the tool. Repeat for the other brake line end. If you screw up the brake line you can buy pre-fabricated 3/16 inch brake lines of various lengths at an auto parts store, you just have to bend them to fit. They are pre-flared and have the metric or standard flare nuts already installed.
flare2.jpg


Making the first part of the double-flare with the adapter

Blow some WD-40 or other solvent through your short line and then blow compressed air through the line to dry it out. Push the brake pedal a little to flush some brake fluid through the line coming from the master cylinder-this must be done to remove any debris that got into the line during cutting, sanding and flaring.

flare3.jpg


Making the second part of the double-flare without the adapter

Warning

You must torque the brake line nuts to 113-190 inch pounds! (about 10-15 foot pounds) If you don't you run the risk of having a nut come lose and dump all of your brake pressure which will result in total brake loss! (The parking brake may still work)

master_cylinder3.jpg


The finished brake pipe with flares at both ends
 
Thanks. We've had a question or two about this.
 
I just found out something. I can buy the short pieces (8" to 5') pre flared with the fitting already on them. It will be cheaper to buy the few I need than to buy a decent flaring set.

I have the bending tool, the "T", and the residual valves. I will pick up the lines on the way to dialysis tomorrow. I didn't know how long of ones to get today.

Maybe I will have brakes by Sunday evening. YelloThumbUp


Still an awesome write up though. We need a lot of these type of tech articles around here.
 

john112deere

caffeine junkie
Staff member
10,807
405
central Vermont
I CAN'T see what's wrong with the one done in that tutorial. Maybe if it was in front of me I could, but the conclusion I've reached from talking to people is that it's easy enough, if someone shows you and maybe checks the first few you do.

Brakes on a vehicle regularly driven at highway speeds are not something to screw with, so I've come to the same conclusion as Brian- preflared lines are the way to go, in my case, at least.
 
That's great, Brian! But now think of allllll that valuable "experience" you will be missing out on!!!
 
That's true, but I should be able to get her back on the road sooner. YelloThumbUp

With me flaring them, I would find leaks, fix them, find more leaks, etc.

I don't like screwing around with brakes or taking chances.

I could have just bought a new stock 1 reservoir master cylinder (cheaper), but I don't like that idea. This way they are power and dual reservoir. Still drum/drum, but they didn't stop too bad with the old leaky master cylinder.

Thank you again for this article. I had no clue what the double flares were that everyone was talking about. Nor how they made them. Even though I may be buying them pre-flared at least I know what they were when I saw them at the parts house.
 
Well, You stand a better chance at an improper bend than you do at an improper flare, but yes, pre-flared sections are great. But this is still important stuff to know should you need to make custom lines for any reason, not just brakes. Fortunately, even a tad bit off, the flares are actually quite forgiving when properly torqued.
One important thing to remember... do NOT use old flare fittings on a new flare. The brass "Molds" to the flare when you torque it down.
Getting back to the bending, just remember that a kinked line is basically a failed line, so don't risk using it if you kink it. Go and get another one.
 
I don't know if you read this in the article, but just a reminder; on your longer pieces, you may want to start a bend with your tool in the middle. Odd as that sounds, if you need to shorten it, the bend is already started and is less likely to kink.
 

Fellro

Moderator
Staff member
The one problem with the premade lines is they are usually too long or too short, rarely the right length, so you either have extra to wind around, or figure out how to make another piece to stretch it out. The second part applies to newer vehicles, sometimes the rubber hose fittings are metric, while the wheel cylinders are standard. This is the case on my 86 250. In this case, unless you can find someone that sells the fittings by themselves, or happen to get lucky and find one specifically made for your vehicle, you have to reuse the metric nut. If the line breaks off inside it, you simply have to hold it in a vise or such, and take a pin punch or such and drive the old line out. If the nut is so bad you can't reuse it, then you have to get the premade unit most likley, so far I haven't had that happen.
 
Good point! Thanks for bringing that up!
 

Fellro

Moderator
Staff member
The loops off the master are to give more area to absorb flex and vibration, without the coils, it would crack at the line nuts, seen it happen when they replaced those lines and didn't leave anything extra. It isn't a big deal, if you aren't worried about appearance. Just make sure it doesn't hang out where it could possibly get caught on road debris, or on the occasion it may see any tall weeds or something. I know you aren't going to go offroading with it, but for those who do, that is very important.
 
actually, a wind is beneficial. As a vehicle goes down the road, there's an element of twisting and flex to the frame, if the lines are straight, without the bend, there's strain on the line. with the bend, there's give.
Looks like Fellro beat me to it lol...
 

Ford Truck Articles

Recent Forum Posts

Top